Manual Ios 10 Restore On Mac 10Manual Ios 10 Restore On Mac DownloadManual Ios 10 Restore On Mac Windows 10Manual Ios 10 Restore On Mac Windows 10Manual Ios 10 Restore On Mac FreeWhen asked, Option-click (Mac) or Alt-click (PC) the Restore option.. You might want to do so after the original files are deleted from your Mac, or the hard disk (or SSD) in your Mac is erased or replaced, such as during a repair.
Select the information to transfer, then click Continue to start the transfer This screen might look different on your Mac:If you have a lot of content, the transfer might take several hours to finish.. By performing such simple command, this should bring up the browse IPSW menu Just browse for your preferred IPSW file and iTunes should restore your device to your desired.. Restore all your filesMake sure that your Time Machine backup disk is connected and turned on, then turn on your Mac.. If your Mac starts up to a setup assistant that asks for details like your country, keyboard, and network, continue to step 2.
manual restore point
manual restore point, manually restore whatsapp backup, manual restore hwid, manual restore ipsw, manually restore iphone, manually restore iphone from backup file, manually restore whatsapp backup from google drive, manually restore ipad, manually restore whatsapp backup iphone, manually restore iphone ipsw Buttons For Mac
Select “Recover from iOS Device”option in the homepage of program For the benefit of all newbies, below is the command on how to Select & Restore Custom IPSW Using iTunes: Windows: Shift+Click on Restore Mac: Alt/Option+Click on Restore.. Choosing the default installation options should be safe Does manual install of pip work on mac.. When the transfer is complete, restart your Mac and log in to the migrated account to see its files. Best Free Photo Mosaic Software For Mac
manual restore hwid
manually restore iphone
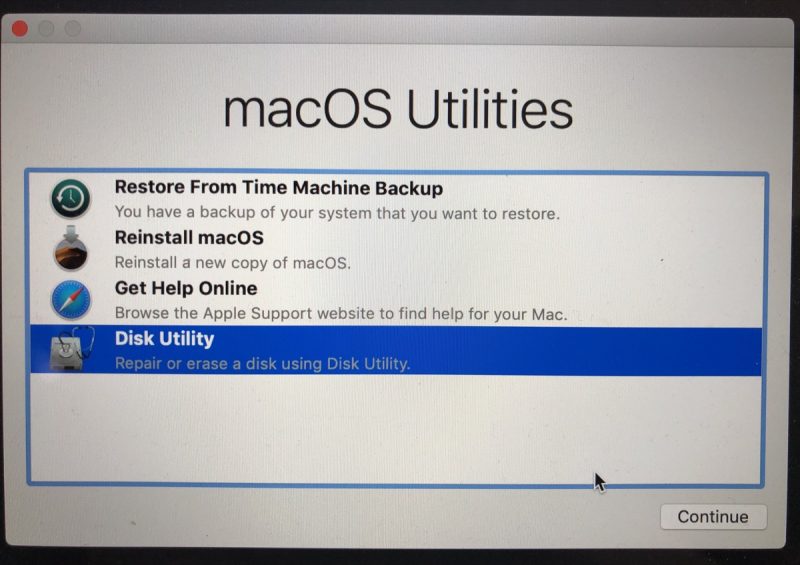
If your Mac doesn't start up all the way, or you also want to restore the macOS you were using when you created the backup, follow the steps to restore both macOS and your files.. Restore from a Time Machine backupWhen you restore from a Time Machine backup, you can choose to restore all your files, or restore both the Mac operating system (macOS) and all your files.. Click Continue in the first Migration Assistant window, then continue to step 2.. If you used Time Machine to create a backup of your Mac, you can restore your files from that backup.. Wait for the Jan 23, 2017 Part 1:Directly Restore Deleted Data from iPhone after iOS 10 Update on Mac. 518b7cbc7d
 0 kommentar(er)
